In-App Help was last updated in 8.6.4 (released 10/23/2019) if you are looking for help with a feature that has been added or enhanced since 8.6.4, please check in Online Help from Help menu.
Checklist for Configuring Shift Opportunities
Note: Your Staff Manager configuration may not include this optional application. To add this application to your configuration, contact your Clinical Consultant or Client Advocate.
The Shift Opportunities function displays scheduling needs to qualified staff members and allows them to sign up for shifts with minimal or no effort by managers. Managers can create open shifts and opportunities through the Schedule Editor and Daily Editor, and employees can easily view and sign up through Clairvia Web.
Enabling the Shift Opportunities function requires you to complete several tasks in Staff Manager Administrator, Staff Manager Client, and Clairvia Web. This checklist guides you through the process and helps ensure that you complete all the necessary steps.
First: Steps in Staff Manager Administrator
- Open Staff Manager Administrator.
- Set the facilities permissions.
- From the View menu, select Facilities. This opens the Facilities dialog box.
- Set opportunities as enabled or disabled by double-clicking a facility's Opportunities cell and selecting Enabled or Disabled from the menu. The default setting is Enabled.
- Set opportunity Rewards as points or dollars by double-clicking a facility's Rewards cell and selecting Points, Dollars, or Disabled from the menu. The default setting is Points. Be aware that if you select Disabled, makes no reference to Opportunity rewards and the Opportunities Reward Report is not available in Clairvia Web.
- Click OK to save your changes.
- Set the profile permissions.
- From the View menu, select Profiles. This opens the Profiles dialog box.
- Select a profile and click Edit. This opens the Edit Profile dialog box. The AutoStaffing tab is the active tab by default.
- Allow users to see and create opportunities in this profile by selecting the Create/View Home Profile Shift Opportunities check box. If users should not be able to create or view opportunities, deselect the check box.
- Allow users to see opportunities in other profiles by selecting the View Other Profile Shift Opportunities check box. If users should not be able to see opportunities in other profiles, deselect the check box.
- Click Apply to save your changes.
- Click OK to close the dialog box.
- Set the security group permissions.
- From the View menu, select Profiles. This opens the Profiles dialog box.
- Select a profile and click Edit. This opens the Edit Profiles dialog box.
- Click the Group Permissions tab.
- Select the security group that should have permission to create Opportunities.
- Click Set Permissions. This opens the Set Interface Permissions dialog box.
- Scroll through the list of interfaces, select Opportunities, and select the desired permission level button. See the following section What the Different Permission Levels Mean for more information.
- Click OK to save changes and close the Set Interface Permissions dialog box.
- Click OK to save changes close the Edit Profile dialog box.
Optional: If your organization plans to attach
skills to opportunity tasks, you need to double-check the global
skill settings. Since profiles may define skills differently, and opportunities may be presented to skills in different profiles, you must set up global skills so a proper skill check can be accomplished before posts opportunities to employees.
- From the View menu, select Global Skills. This opens the Global Skills dialog box.
- Review Global Skill descriptions and abbreviations, making any changes or additions needed.
- Click OK to save changes or click Cancel if you did not make any changes.
Second: Steps in Staff Manager Client
- Open Staff Manager Client.
- Double-check global skills settings. If a profile skill is not mapped to a global skill, does not display opportunities.
- From the Maintain menu, select Skill. This opens the Skill dialog box. Each profile skill should have a global skill listed beside it. If the global skill reads unspecified, the profile skill has not been mapped to a global skill.
- To map a skill to a global skill, click the Global Skill cell to open the menu. Select the desired global skill.
- Repeat the previous step for other profile skills, if necessary.
- Click Apply to save the changes.
- Click OK to close the dialog box.
- Set the employee-level permissions: Allow selection of shift opportunities in home profile and Allow selection of shift opportunities in other profiles. These permissions are selected by default for existing employees. You must set permissions for new employees, as well as removing these permissions from existing employees who should not use opportunities.
- From the Maintain menu, select Employee Info. This opens the Employees dialog box.
- Click the Permissions tab. (Use the right scroll arrow to access this tab.)
- To allow an employee to select home profile shift opportunities, select the check box. To prevent employees from selecting home profile shift opportunities, deselect the check box.
- To allow an employee to select other (float) profile shift opportunities, select the check box. To prevent employees from selecting other (float) profile shift opportunities, deselect the check box.
- Click Apply to save your changes.
- Click OK to close the dialog box.
Third: Steps in Clairvia Web
- Open Clairvia Web.
- Configure the shift opportunities manager's view.
- From the Configure menu, select Manager View. This opens the Manager View page.
- Select the check box for Show Opportunities to see opportunities on manager dashboard. If you not want to see opportunities on the manager dashboard, deselect the check box.
- (Optional) Select the check box for Show Seniority Date in Opportunity Details. If you select this box, the Opportunity Details window displays employees' seniority dates. If you deselect this box, the window does not display seniority dates.
- Click Save Changes.
- Configure the shift opportunities employees' view.
- On the Configure menu, select Employee View. This opens the Employee View page.
- Select the check box for Show Opportunities to allow employees to view opportunities on their dashboards. To prevent employees from seeing opportunities, deselect the check box.
- Click Save Changes.
- Configure the shift opportunities settings.
- On the Configure menu, select Opportunity Settings. This opens the Opportunity Settings page with the Options and Messages tab active. You can create opportunity-related messages for employees and set preferences for overtime and the type of opportunity: Schedule Me (auto-approved) or Consider Me (manager-approved). The tab contains the following fields:
- Display Service related to Posting Profile
- Set Opportunity default type to Auto Approve
- Set Overtime default to Approved
- Create an Auto Approve Opportunity Confirmation Message
- Create a Consider Me Confirmation Message
- Create an Opportunity Accepted Message
- Create an Opportunity Denied Message
- General Comments
- Click the Shifts tab. This tab lets you set the default settings for opportunities by shift, skill, day of week, and holiday (if a holiday schedule has been defined in Staff Manager Client). You assign a default number of points or dollars. For the Rewards table to display a task, the task must have 100% coverage, have a skill associated with it, and count towards overtime.
- Click the Posting Groups tab to configure posting groups. Each opportunity must be assigned to a posting group.
- Click Add New Posting Group. This opens the Add/Edit Posting Group dialog box.
- Enter a label for the group.
- Enter a description for the group.
- From the This Posting Group is Private to menu, select either This group is public or a profile.
- From the Available Profiles selection dialog box, select the profile or profiles to associate with the group, and then click the left arrow to move them to the Profiles Included for Posting Group dialog box. If you add a profile in error, select the profile name in the Profiles Included for Posting Group dialog box and then click the right arrow to move it back to the Available Profiles dialog box.
- Click Add New.
- Click the Posting Schedules tab and create a posting schedule. The Posting Schedule determines when groups get to view the opportunity. You could create a schedule so that employees in their Home group get to see an opportunity 14 days before the shift, while employees in their Float group do not see the opportunity until 10 days before the shift. This lets you prioritize which groups have the first chance to fill the opportunity.
- If no posting groups are listed in the schedule, select one from the Available Posting Groups menu at the bottom of the page and click Add. Repeat as needed until all desired groups are shown on the page.
- Complete the Posting Begins (Days/Hours before) boxes. Enter the number of days before the opportunity in the first box and the hours before the opportunity in the second box.
- Complete the Posting Expires (Days/Hours before) boxes. Enter the number of days before the opportunity in the first box and the hours before the opportunity in the second box.
- Click Save Changes.
There is also a profile menu where you can select multiple profiles. Then, depending on whether the changes should be made to the current profile or the selected profiles, click one of the following buttons: Save to currently selected profile or Save to these multiple profiles.
To reset the Options and Messages tab contents to the default settings, click Reset in the lower-right corner.
What the Different Permission Levels Mean
None permission means the members of this group
- Can
- See Opportunities on the schedule
- Add an employee to an Opportunity if their schedule rights allow it
- Delete a filled shift that has a connected opportunity if their schedule rights allow it (the Opportunity are restored its original state)
- Cannot
- View the Opportunity Work List
- Create an Opportunity with an Open Opportunity Need
- Create an Opportunity with an Open Shift Need
- Increase or decrease the number of Open Opportunity Needs
- Increase or decrease the number of Open Shift Needs
- Change Opportunity settings (rewards, Consider Me/Schedule Me)
Read permission means the members of this group can do everything members with None permission can do plus
- View Opportunity Details
- View the Opportunity Work List
Full permission means the members of this group can do everything members with Read permission can do plus
- Create an opportunity with an Open Opportunity Need
- Create an opportunity with an Open Shift Need
- Increase or decrease the number of Open Opportunity Needs
- Increase or decrease the number of Open Shift Needs
- Change opportunity settings (rewards, Consider Me/Schedule Me)
Optional: Configuring Shift Opportunities for the External Resource Management Interface
If a facility is equipped with the optional External Resource Management (ERM) interface, the Opportunities Settings page has an additional tab: External Notifications. Instructions for configuring the ERM interface are in Help.
Additional Shift Opportunity Information
In the following illustration, the user is setting a default value of 100 points for the 7a-3p RN and Charge RN shifts on all days of the week. After clicking Assign, the tab refreshes to show the values added to the table:
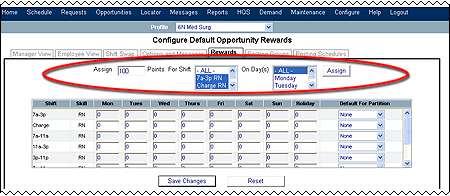
Next, users must select a task for each partition in the Default for Partition column. This determines which tasks are populated when filling vacancies to core coverage in Schedule Editor.
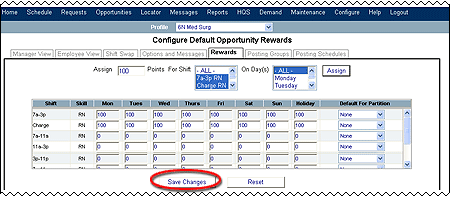
You can save the changes by clicking Save Changes.
You can override the default rewards set in when you create opportunity in Staff Manager Client.
The Profiles menus show the user what profile or profiles the posting group applies to. The Remove button is only used if the user wants to remove a posting group from the schedule.

Shift Swaps and Opportunities
If a facility enabled shift swaps, managers should be aware that employees cannot swap an Opportunity shift with an associated reward. If an employee wants to swap an Opportunity shift they were granted, the swap must be completed manually by a manager, who determines whether the reward should be given to the new employee.
 Related Topics