In-App Help was last updated in 8.6.4 (released 10/23/2019) if you are looking for help with a feature that has been added or enhanced since 8.6.4, please check in Online Help from Help menu.
Note: Your Staff Manager configuration may not include this optional application. To add this application to your configuration, contact your Clinical Consultant or Client Advocate.
Organizations use Outcomes-Driven Acuity to calculate staffing based on patient acuity. This requires that caregivers complete a patient acuity assessment for every patient, which results in the dynamic calculation of acuity. In addition to the set up in Staff Manager Administrator and Staff Manager Client, use of Outcomes-Driven Acuity requires that you complete the following steps.
The implementation of acuity requires that your Cerner Corporation Clinical Consultant populate the outcomes table through Interface Manager with Nursing Outcomes (NOC) or other outcomes, as determined by your organization. This file enables the Clinical Consultant to perform the following tasks.
Enterprise Administrators automatically have read and write access to Outcomes-Driven Acuity. They must update the other security groups, however, if those groups should have access to Outcomes-Driven Acuity.
If you plan to have support staff print assessment pages for employees to use as a reference or to include in patient charts, you should create a group permission for the support staff with read access to Acuity data.
The following table describes how each setting affects security group access to acuity data.
| Acuity Data Interface Permission | Patient Assessment Page | Assessment Status Page | Patient Assessment History Page | Patient Assessment Audit Page |
| None | No Acuity Menu Presented in Staff Manager | |||
| Read | Cannot access | Can view and print historical assessments | Can view history and view and print assessments | Cannot access |
| Full | Can access and create assessments | Can view, print, create, and edit assessments | Can view history and view and print assessments | Can view and create audits |
The following table describes how each setting affects employee access to acuity data.
| Employee Permission | Patient Assessment Page | Assessment Status Page | Patient Assessment History Page | Patient Assessment Audit Page |
| Read Access to Acuity Data | Cannot access | Can view and print historical assessments | Can view but cannot delete an assessment; can view and print assessments in History and in Audit Printable View | Cannot access |
| Read and Write Access to Acuity Data | Can access and create assessments | Can view, print, create, and edit assessments | Can view and delete an assessment; can view and print assessments in History and in Audit Printable View | Can access |
Any employee responsible for entering patient acuity assessments must be in a security group with Full access to Acuity data in Staff Manager Administrator or have Read and Write Access to Acuity Data checked on the Permissions tab of the Employees dialog box in Staff Manager Client.
Any employee responsible for conducting patient assessment audits for evaluating Interrater reliability must be in a security group with Full access to Acuity data in Staff Manager Administrator or have Read and Write Access to Acuity Data checked on the Permissions tab of the Employees dialog box in Staff Manager Client.
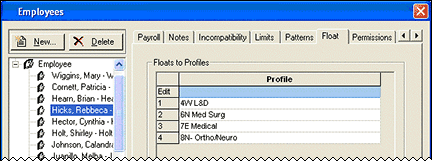
In addition to permission settings in Staff Manager Administrator and Staff Manager Client, Outcomes-Driven Acuity uses security information about each employee to determine which profiles and locations that employee can select in the left pane of the Clairvia Web Acuity pages. Each employee automatically receives access to all employee home profiles and associated locations. This means that employees with concurrent jobs are able to select and view patients in each profile considered one of their home profiles. The employee also receives access to all profiles included in their Floats To Profile menu.
EXAMPLE
Employee Rebecca Hicks has read and write access permissions for acuity. Based on the information in her Floats To Profile menu, she is able to enter and edit patient assessments for patients in 5W MedSurg (her primary home profile) as well as 4W L&D, 6N MedSurg, 7E Medical and 8N Ortho/Neuro.
 Related Topics