In-App Help was last updated in 8.6.4 (released 10/23/2019) if you are looking for help with a feature that has been added or enhanced since 8.6.4, please check in Online Help from Help menu.
Configuring Criteria-Based Library Progress Patterns
Note: Your Staff Manager configuration may not include this optional application. To add this application to your configuration, contact your Clinical Consultant or Client Advocate.
As mentioned in Patient Pattern Management Terms, progress patterns outline a patient’s entire hospital stay and summarize the care the patient needs to achieve the optimal outcome. Every progress pattern starts as a library pattern: an average length of stay (LOS) defined for patients with similar characteristics. You configure library progress patterns with the Progress Patterns page.
Important Information about Progress Patterns and the Progress Patterns Page
Criteria-based library progress patterns can be DRG patterns or Non-DRG-based patterns comprised of one or more ICD codes, diagnoses, or admit reasons. The length of stay for each pattern can be defined by duration by level of care group (that is, Critical Care, Intermediate, and Routine), by total length of stay (TLOS), or both.
Standard DRG information is imported during the Demand Manager Implementation process, creating a library pattern that aligns exactly to the Standard TLOS for a select DRG classification. Examples of Standard DRG classification include Medicare Severity DRG (MS DRG) and All Patient Refined DRG (APR-DRG).
Standard DRG patterns are not assigned a level of care group during the import process; all Standard DRG library patterns start with the level of care group Unassigned. Changing the level of care group from Unassigned or modifying the expected TLOS creates a Custom Library DRG pattern. In addition, the most common ICD codes and diagnoses can also be assigned to DRGs.
You should configure custom DRG patterns so that they align to the benchmarks or TLOS goals for your organization. Assigning one or more Level of Care groups to the pattern allows you to monitor patients LOS as they progress from one level of care group to the next. DRG library patterns are assigned to patients upon receipt of an admitting, working, or final DRG from the registration application, or you can enter the pattern directly using Clairvia Web.
In the absence of an admitting or working DRG value, configuring non-DRG-based library patterns lets you associate patients with similar primary ICD codes, primary diagnoses, and admit reasons with an expected average LOS, either in total or by level of care. For example, a non-DRG pattern for COPD might have the following criteria assigned:
- ICD codes 490 - 496
- Diagnoses of chronic obstructive pulmonary disease, chronic bronchitis, and emphysema
Patient Progress Manager assigns non-DRG-based library patterns to patients when it receives the criteria from the registration application or when a user assigns the pattern manually.
The LOC Details Tab

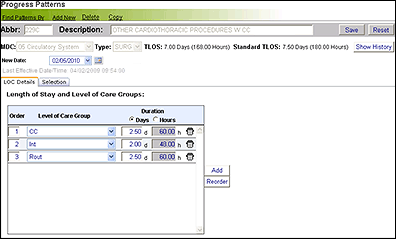
The LOC Details tab is where you enter Level of Care details. The preceding illustration shows the level of care groups for a custom DRG pattern, 229C Other Cardiothoracic Procedures W CC. This pattern has three Level of Care groups.
- CC (Critical Care) with a duration of 2.50 days
- Int (Intermediate Care) with a duration of 2.00 days
- Rout (Routine Care) with a duration of 2.50 days
All patients admitted on or after February 5, 2010, with DRG 229 are assigned this library pattern. Patients with DRG 229 are expected to be in Critical Care for 2.5 days, transfer to an Intermediate Care location for 2.0 days, and then transfer to a Routine Care location for 2.5 days. The total length of stay (TLOS) is 7.00 days. The standard TLOS for DRG 229 is 7.5 days. This custom pattern shows that the organization has established a duration by level of care that allows patients to achieve discharge status 0.5 days faster than standard.
The Selection Tab

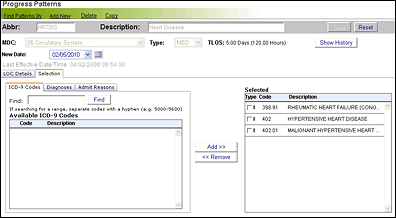
The Selection tab displays the criteria associated with a pattern. The preceding illustration shows a pattern for patients with heart disease. There are three ICD codes associated with this pattern.
- 399.91 Rheumatic Heart Failure (Congestive)
- 402 Hypertensive Heart Disease
- 402.01 Malignant Hypertensive Heart Disease with CHF
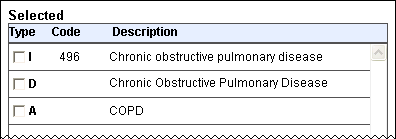
The following illustration looks more closely at the Selected criteria table and how it lists criteria data.

The first column, Type, identifies the criteria type: I for ICD, D for diagnosis, and A for admit reason. Rows are sorted by type in the following order.
- ICD in numeric order by code number
- Diagnoses in alphabetic order
- Admit reasons in alphabetic order
The Type column also contains the select check box. Select the check box beside the criteria you want to remove from the Selected table.
The second column, Code, lists the ICD code number, where applicable. The third column, Description, lists the text description for the criteria.
The Progress Pattern History Window
Clicking the Show History icon on the Progress Patterns page opens a pop-up window. This window displays a list, sorted by effective date, of the level of care groups and criteria associated with a pattern. Click the plus sign (+) beside an effective date to expand the row and see level of care and criteria information.
You can click Reset to undo any edits made since you last saved the configuration.
Finding a Library Progress Pattern
Before adding a progress pattern, you should make sure a pattern for the specific criteria does not already exist in the application. You can check the Progress Pattern Library, or you can use the Find Pattern function on the Progress Patterns page.
- From the Configure menu, select Demand Manager > Progress Patterns. This opens the Progress Patterns page.
- In organizations with multiple facilities, there is a Facilities list on the right side of the green menu bar. Select a facility from the menu.
- Point to the Find Pattern By menu and select Criteria. The Progress Pattern Search window opens.
- In the Find box, enter at least three characters of the criteria or desired pattern abbreviation or description (for example, chest or 313 to find pattern DRG 313 Chest Pain). The criteria used to configure library patterns are facility-specific and may be a DRG code, ICD code, Diagnosis, or Admit Reason.
- Click Go.
Patient Progress Manager searches the criteria, criteria description, pattern abbreviation, and pattern description for current patterns and patterns with a future effective date containing the text you entered in the order in which it is entered. For example, if you enter eye disorder, the search returns all patterns with the words eye disorder in the pattern abbreviation or pattern description and any patterns with assigned criteria containing the words eye disorder in the criteria abbreviation or criteria description.
Patient Progress Manager first orders Find results by pattern abbreviation. It then orders the results by date (current patterns, then patterns with future effective dates). Pattern abbreviations are first ordered by numeric code, then alphabeticly. The results are grouped so that all criteria assigned to the pattern display in rows underneath the pattern row. Criteria may be DRG codes, ICD codes, Diagnoses, or Admit Reasons.
Patient Progress Manager displays the following information in the pattern row for each match:
- Pattern abbreviation
- Pattern description
- Effective date
- LOS (Days)
The Criteria row associated with each pattern displays the following information:
- Criteria
- Criteria description
You should note, however, that Patient Progress Manager suppresses the criteria description if it is identical to the pattern description.
If Patient Progress Manager cannot find any pattern matches for your entered text, the window displays the message No matches found.
To view the pattern, you can click the pattern row or any criteria row under the pattern to select it, then click Select, and Patient Progress Manager loads the pattern in the Progress Patterns page.
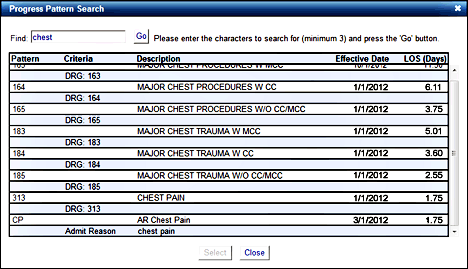
In this illustration, a user entered the word chest and Patient Progress Manager returned the following DRG and Admit Reason patterns.

Adding a Custom DRG Progress Pattern
You can edit a Standard DRG pattern to create a Custom DRG pattern by adding a Level of Care Group or modifying the TLOS. Patient Progress Manager replaces Standard DRG patterns with Custom DRG patterns when it receives the associated DRG from the registration application or when a user manually assigns the DRG.
When Patient Progress Manager receives an updated Standard DRG version, it automatically updates any associated Custom DRG patterns. Patient Progress Manager revises the Custom pattern description, MDC, weights, and Standard TLOS as needed, while keeping the custom LOS and level of care settings. It then assigns the revised Custom DRG pattern a new effective date.
Your Cerner Clairvia Clinical Consultant imports an updated Standard DRG version to your application as needed.
Complete the following steps to add a custom DRG progress pattern:
- From the Configure menu, select Demand Manager > Progress Patterns. This opens the Progress Patterns page.
- In organizations with multiple facilities, there is a Facilities list on the right side of the green menu bar. Select a facility from the menu.
- Point to the Find Pattern By menu and click Criteria. The Progress Pattern Search window opens.
- In the Find box, enter at least three characters of the criteria or desired pattern abbreviation or description (for example, chest or 313 to find pattern DRG 313 Chest Pain). The criteria to search are facility-specific and must be configured in Patient Progress Manager. The criteria used to configure library patterns may be a DRG code, ICD code, Diagnosis, or Admit Reason.
- Click Go.
- Select the pattern row or any criteria row under the pattern and then click Select. This closes the Progress Pattern Search window and opens the pattern in the Progress Patterns page. Be aware that you cannot edit the MDC, Type, or Standard TLOS information for a custom DRG pattern.
- Enter a New Date in the box or click the calendar icon to use the date menu. The current date is entered by default.
- Assign length of stay or levels of care or both for the custom pattern using the LOC Details tab.
- The first row displays the Level of Care Group as Unassigned by default. If you want to, you can select a different level of care group from the menu.
- Enter a duration. Select Days or Hours and then enter the number in the box. For example, if the duration should be 2.5 days, select Days and enter 2.5, or select Hours and enter 60. Patient Progress Manager updates the pattern's TLOS value automatically based on your entries. The length of stay duration cannot exceed 365 days or 8760 hours.
- If you want to, you can click Add to add a second level of care row and complete its options. All level of care groups available for assignment will display in the list. The Unassigned level of care is no longer available once a second level of care group is added.
- Deleting a Level of Care Group from the Pattern: You can remove level of care groups entered in error by clicking the row and then clicking Remove.
- Reordering Level of Care Groups: You can level of care group order by numbering the groups as desired in the Order column, then clicking Reorder.
- (Optional) Select criteria using the Selection tab.
- Click the Select tab to open it.
- On the Select tab, click the appropriate criteria tab.
- Click ICD to use one or more ICD codes.
- Click Diagnoses to use one or more diagnosis.
- Click Admit Reasons to use one or more Admit Reasons.
- Find the criteria you want by entering it in the box and clicking Find. The available Criteria grid is populated using all active criteria data. Data in gray displays criteria that are currently associated with other patterns; the associated pattern abbreviation is displayed in parentheses. You must remove these criteria from their current patterns before assigning them to a new pattern.
- Select the check box beside the criteria you want and click Add. This adds the criteria to the Selected table.
- If needed, repeat the process using the other criteria tabs.
- Removing Criteria: You can remove a criterion added in error by selecting the check box beside the criteria in the Selected table, then clicking Remove.
- Click Save. The letter C is added to the DRG code to indicate that this is a Custom DRG pattern. For example, DRG 227C is a Custom DRG pattern created from edits to the Level of Care groups or TLOS.
Upon saving, Patient Progress Manager performs the following validation checks.
- Does TLOS exceed Standard LOS? If so, Patient Progress Manager gives you the following message: The TLOS you entered exceeds the Standard TLOS for this pattern. If this is correct, click OK.
- Are there level of care group order duplicates, such as two levels of care assigned order number 1? If so, Patient Progress Manager prompts you to correct the duplicated data.
- Are the abbreviation duplicates? If so, Patient Progress Manager prompts you to enter a unique abbreviation.
Adding a Non-DRG-based Progress Pattern
You can add non-DRG-based patterns; that is, patterns that use admit reasons, ICD codes, or diagnoses instead of DRG codes.
Complete the following steps to add a non-DRG-based progress pattern:
- From the Configure menu, select Demand Manager > Progress Patterns. This opens the Progress Patterns page.
- In organizations with multiple facilities, you will see a Facilities list on the right side of the green menu bar. Select a facility from the menu.
- Point to the Add New menu and select Non-DRG-based Pattern. The page refreshes to show a blank progress pattern form.
- Enter an abbreviation (Abbr) for the new pattern, such as COPD. Each abbreviation must be unique; Patient Progress Manager validates the abbreviation when you click Save. If the abbreviation already exists, Patient Progress Manager prompts you to select another.
- Enter a description for the pattern, such as Chronic Obstructive Pulmonary Disease.
- Select a Major Diagnostic Category (MDC) from the menu. MDCs are imported into Patient Progress Manager during the Demand Manager implementation process.
- Select a Type. Available options are MED, SURG, and NONE
- Enter a New Date in the box or click the calendar icon to use the date menu. The current date is entered by default.
- Assign length of stay or levels of care or both for the new pattern using the LOC Details tab.
- The first row displays the Level of Care Group as Unassigned by default. If desired, you can select a different level of care group from the menu.
- Enter a duration. Select Days or Hours, then enter the number in the box. For example, if the duration should be 2.5 days, you can click Days and enter 2.5, or click Hours and enter 60. Patient Progress Manager updates the pattern's TLOS value automatically based on your entries. The length of stay duration cannot exceed 365 days or 8760 hours.
- If you want to, you can click Add to add a second level of care row and complete its options. All level of care groups that are available for assignment are displayed in the list. Unassigned level of care is no longer available once a second level of care group is added.
- Deleting a Level of Care Group from the Pattern: You can remove level of care groups entered in error by clicking the row and then clicking Remove.
- Reordering Level of Care Groups: You can change the level of care group order by numbering the groups in the Order column, then clicking Reorder.
- Select criteria using the Selection tab.
- Click the Select tab to open it.
- On the Select tab, click the appropriate criteria tab. All non-DRG-based patterns must use at least one criterion.
- Click ICD to use one or more ICD codes.
- Click Diagnoses to use one or more diagnosis.
- Click Admit Reasons to use one or more Admit Reasons.
- Find the criteria you want by entering it in the box and clicking Find. The available Criteria grid is populated using all active criteria data. Data in gray displays criteria that are currently associated with other patterns; the associated pattern abbreviation is displayed in parentheses. You must remove these criteria from their current patterns before assigning them to a new pattern.
- Select the check box beside the desired criteria and click Add. This adds the criteria to the Selected table.
- If needed, repeat the process using the other criteria tabs. For example, a user creating a COPD pattern might select the ICD code 496, the diagnosis Chronic obstructive pulmonary disease, and the admit reason COPD.
- Removing Criteria: You can remove a criterion added in error by selecting the check box beside the criteria in the Selected table, then clicking Remove.
- Click Save.
Upon saving, Patient Progress Manager performs the following validation checks.
- Are there level of care group order duplicates, such as two levels of care assigned order number 1? If so, Patient Progress Manager prompts you to correct the duplicated data.
- Are the abbreviation duplicates? If so, Patient Progress Manager prompts you to enter a unique abbreviation.
Editing a Progress Pattern
You can open a progress pattern for editing by clicking its pattern abbreviation or description on the Progress Pattern Library page or by finding it using the Find Patterns by Criteria Progress Pattern Search page.
Complete the following steps to edit a progress pattern:
- From the Configure menu, select Demand Manager > Progress Patterns. This opens the Progress Patterns page.
- In organizations with multiple facilities, there is a Facilities list on the right side of the green menu bar. Select a facility from the menu.
- Find the pattern using the steps in the preceding section Finding a Progress Pattern.
- Enter a New Date in the box or click the calendar icon to use the date menu. The current date is entered by default. The last date and time the pattern was edited is shown beneath the New Date box as the Last Effective Date/Time.
- Make your changes.
- Click Save.
Copying a Progress Pattern
You can open a progress pattern for copying by clicking its pattern abbreviation or description on the Progress Pattern Library page or by finding it using the Progress Patterns page.
Complete the following steps to copy a progress pattern:
- From the Configure menu, select Demand Manager > Progress Patterns. This opens the Progress Patterns page.
- In organizations with multiple facilities, there is a Facilities list on the right side of the green menu bar. Select a facility from the menu.
- Find the pattern using the steps in the preceding section Finding a Progress Pattern.
- Click Copy in the green menu bar. The page refreshes to show the abbreviation [Pattern Name]_Copy and the description [Pattern Name]_Copy. The Copy function copies only the level of care group and duration from the selection tab to the new pattern.
- Make your changes, such as giving the copied pattern a new abbreviation and description. You cannot add Custom DRG patterns using the Copy function; you can only create new Non-DRG-based patterns with the Copy function.
- Click Save.
Deleting a Progress Pattern
You can open a progress pattern for deletion by clicking its pattern abbreviation or description on the Progress Pattern Library page or by finding it using the Progress Patterns page.
Complete the following steps to delete a progress pattern:
- From the Configure menu, select Demand Manager > Progress Patterns. This opens the Progress Patterns page.
- In organizations with multiple facilities, there is a Facilities list on the right side of the green menu bar. Select a facility from the menu.
- Find the pattern using the steps in the preceding section Finding a Progress Pattern.
- Click Delete in the green menu bar. This opens a confirmation pop-up window.
- Click OK to delete the pattern. When you delete a pattern, the criteria associated with it become available to be assigned to other patterns.
You cannot delete Standard DRG patterns. Custom DRG patterns, however, can be deleted using the preceding steps. When a custom DRG pattern is deleted, the Standard DRG pattern becomes available for use in the Pattern Library.
 Related Topics


