In-App Help was last updated in 8.6.4 (released 10/23/2019) if you are looking for help with a feature that has been added or enhanced since 8.6.4, please check in Online Help from Help menu.
Only users logged in as administrators with access to the Staff Manager Human Resources (HR) Interface can access the Interface Maintenance function. This function is interactive and provides details at the profile level for each run of the HR Interface.
Complete the following steps to view HR transactions and exceptions:
The HR Interface Transactions and Exceptions View and Report displays changes made to an employee record by the HRIS Import interface. You may need to update these changes in the HRIS application manually. The report also displays changes that the interface could not be make during the run due to configuration, mapping, or other constraints.
You should not use this report as validation for existing employee records.
Staff Manager tracks the following transactions and exceptions are for this functionality.
Security is based on your Clairvia Web Managed Profile access. Using the current Clairvia Web functionality, the list is generated based on the profile in view in the Profile Selection option. The list on the HR Interface Employee Maintenance page contains only the profiles to which you have access.
The Staff Manager HR Interface configuration has been modified to allow configuration of an email notification to be sent to a specified email address if exceptions occur when the HR Interface runs. This email message is sent for each HR Interface run that has one of the qualifying exceptions (new employee, FTE change, skill change, transfer, termination, or application unable to write new skill).
If the content of the email message needs to be modified, you can do so by editing the SMTPSettings section of the HR_settings.xml configuration file. Here is an example.
<SMTPSettings>
<SMTPServer>SMTP.mysite.com</SMTPServer>
<SMTPToAddress>john@mysite.com</SMTPToAddress>
<Email>
<From>HRInterface@mysite.com</From>
<Subject>HR Interface Email Notification</Subject>
<Body>The HR interface has run and there were exceptions.</Body>
</Email>
</SMTPSettings>
The information displayed in this view varies based upon the type of transaction or exception.
The options above are only displayed when affected by the interface run (that is, if there is no EmpAction in the interface record, the Employee Action cell is blank).
The HR Employee Maintenance view is interactive and enables you to remove transactions and exceptions from view. This allows the page to work as an action item list for you. As the interface adds or updates employees, the page displays those employees. If data is missing or incorrect, the first and best option is to update the HRIS application with the missing information so that it goes to Staff Manager in the next interface run. If the data is unavailable in the HRIS, make the necessary updates to the employee records; once you have finished updating an employee record, you can remove that transaction from the menu.
It is recommended that you run and print a report before clearing exceptions, since an exception is not displayed in view or print in a report once you clear it. See Running the HRIS Transactions and Exceptions Report for more information.
Complete the following steps to remove transactions and exceptions.
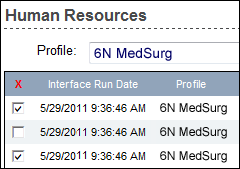
The following illustration shows two items marked for removal on the Human Resources interface maintenance page.

The HRIS Transactions and Exceptions report prints a list of all non-cleared exceptions from a particular interface run for a selected profile or for all profiles.
The report date is displayed at the top of the report, as shown in the following illustration.
The report sorts transactions by effective date in ascending order and includes the same information that is in the view. Data included in each transaction depends on the type of transaction or exception made during the interface run. Interface run date, profile name, effective date, employee name, employee ID, Skill/Job Code, and FTE are included for all exceptions and transactions captured during each HR interface run. Data is displayed in the Previous Profile, Previous Skill, Previous FTE, and Employee Action columns under the conditions described in Understanding the Data in the HR Interface Employee Maintenance View.