In-App Help was last updated in 8.6.4 (released 10/23/2019) if you are looking for help with a feature that has been added or enhanced since 8.6.4, please check in Online Help from Help menu.
The Length of Stay Analysis by Location Pattern Report
Upon admission or transfer in, assigns a progress pattern to each patient based upon pattern assignment criteria received and the hierarchy for using the criteria. If no criteria are provided, or if there is not a pattern defined based on the criteria received or entered, the patient is assigned a pattern based on their location or their location and hospital service combination (if defined). Each Demand location is configured with a location pattern; location and hospital service-based patterns are optional.
The Length of Stay Analysis by Location Pattern Report is designed to:
- Analyze whether the defined progress patterns are appropriate.
- Determine which discharged patients are above or below the expected LOS for the location or location and hospital service combination.
This report compares each patient’s actual length of stay (LOS) to the Library pattern LOS by location within a profile. The report can list all records within a date range or provide a summary.
Running the Length of Stay Analysis by Location Pattern Report
Complete the following steps to run the Length of Stay Analysis by Location Pattern report:
- From the Reports menu, select Demand > Length of Stay Analysis by Location Pattern. The selection criteria page opens.
- Select one or more facilities from the Facilities menu. Use CTRL+click to select multiple items. Use SHIFT+click to select a range of items.
- Select one or more profiles from the Profiles menu. Staff Manager automatically limits the profiles displayed to those set up for Demand. Once a profile is selected, all defined locations within the profile will also be included.
-
Enter a start date in the box or click the calendar icon to use the date menu.
-
Enter an end date in the box or click the calendar icon to use the date menu.
- Select a Display Summary Data Only option.
- Selecting Yes means that the report only displays a summary by profile and pattern, without specific patient pattern details.
- Selecting No means that the report lists all patient records within the selected date range.
- Select a Calculate LOS in Hours/Days option.
- Selecting Hours means that the report lists the patients' LOS in hours.
- Selecting Days means that the report lists the patients' LOS in days.
- Select a Secondary Sort option. This option only applies if you select No for the Display Summary Data Only option.
- Selecting Patient Name means that the report sorts the records by patients' last names.
- Selecting Actual LOS means that the report sorts records by length of stay (LOS) in descending order (going from the longest LOS to the shortest).
- Selecting Patient Account Number means that the report sorts the records by patients' assigned account numbers in ascending order (going from the lowest number to the highest).
- Select an Export Type.
- If you select PDF, Staff Manager opens the report results as a PDF.
- If you select Microsoft Office Excel, Staff Manager exports the report results as an Excel spreadsheet. You must have Microsoft Office Excel or Excel Viewer installed on your workstation to use this option.
- Click Run Report. If you selected the PDF export type, the report is displayed in the Report Output pane. If you selected the Excel export type, an alert window opens to allow you to select whether to open the report or to save the report as an Excel spreadsheet. It is recommended selecting Save so that you can review the report in Excel.
Be aware that report formatting is not retained when you export a report to Excel.
Viewing the Length of Stay Analysis by Location Pattern Report
This report compares each patient’s actual length of stay (LOS) to the Library pattern LOS. Depending on your choices, the final report displays all records within a date range with a summary showing average data by day of week, or displays the summary alone.
The report results are first sorted by profile, then by pattern name, then by your selected sort order:
- Patient Name sorts the results by patients' last names
- Actual Length of Stay sorts the results by LOS in descending order (going from the longest LOS to the shortest)
- Patient Account Number sorts the results by patients' assigned account numbers in ascending order (going from the lowest number to the highest)
The report contains the following information.
- Report Title: Length of Stay Analysis by Location Pattern
- Discharged between [Date] and [Date] in Hours/Days: This displays the start and end dates you selected when running the report. It also includes whether you ran the report by Hours or by Days. The report can only include patients that have left a location (through transfer out or discharge) within the selected profile.
- Profile and Location Name: Pattern Name: Selected profile, location, and pattern name; when the pattern name is the same as the location, it is the default pattern for the location.
- Expected LOS: The pattern length of stay in Hours or Days, depending on your selection.
- Pt Account #: The patient's assigned account or encounter number
- Patient Name: The patient's name is displayed in Last Name, First Name Middle Initial format.
- Arrival Date: The date the patient was admitted or transferred to the location in the selected profile.
- Arrival Time: The time the patient was admitted or transferred to the location in the selected profile.
- Departure Date: The date the patient was discharged or transferred out of the location in the selected profile.
- Departure Time: The time the patient was discharged or transferred out of the location in the selected profile.
- Actual LOS: The total time the patient stayed on the location in the profile shown in Hours or Days, depending on your selection.
- Variance from Expected: The value calculated by subtracting the Expected or Pattern LOS from the patient's Actual LOS; the result is shown in Hours or Days, depending on your selection.
- % of Expected (Actual/Expected): The percent of expected LOS, calculated by dividing the Actual LOS by the Expected LOS.
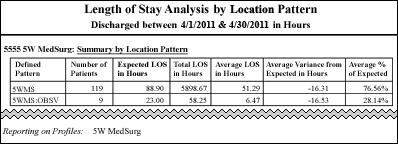
- Profile Name: Summary by Location Pattern table: Summary provided after each profile; includes the following information.
- Defined Pattern: The patient progress pattern or patterns used on the selected profile.
- Number of Patients: The total number of patients on the profile during the selected date range.
- Expected LOS: The pattern length of stay in Hours or Days, depending on your selection.
- Total LOS: The total time all patients spent in the location in the profile during the selected date range, shown in Hours or Days, depending on your selection.
- Average LOS: The average time patients spent in the location in the profile during the selected date range, shown in Hours or Days, depending on your selection
- Average Variance from Expected: The value calculated by subtracting the Expected LOS from the Average LOS, shown in Hours or Days, depending on your selection.
- Average % of Expected: The average percent of expected LOS, calculated by dividing the Average LOS by the Expected LOS.
If you selected Display Summary Date Only, the report only displays the profile summary tables. At the bottom of the report, Demand Manager displays the profiles included in the report.
Sample Reports
The following illustration depicts a full report:

This illustration depicts a summary report:
 Related Topics