In-App Help was last updated in 8.6.4 (released 10/23/2019) if you are looking for help with a feature that has been added or enhanced since 8.6.4, please check in Online Help from Help menu.
Printing Requests
You can print your requests from the My Requests page by clicking the Printable View button  . This opens the printable view in separate window. Then click the Print button in the header to print your requests. If you have access to a color printer, the printable view prints in color. To get the best view of your requests, print the document in landscape (horizontal) format.
The printable view displays data based on your selected page view options:
- Your selected profile in view
- Calendar by Task (default view)
- Calendar by Employee
- Weekly by Task
- Weekly by Employee
The printable view also displays the data based on your select Show options:
- Show Only Requests (both Calendar and Weekly View)
- Show Only My Schedule (Weekly View only)
- Show Needs (Weekly View only)
If you have filters set up, you can use them to limit the information in view also.
The Request Header
Whichever view you print, the Request Header stays the same. The header table includes the following information:
| Facility:
|
[Name of your facility] |
Profile:
|
[Name of your selected profile] |
| Logged in as:
|
[Your user name] |
Filter:
|
[Name of applied filter, if any; otherwise this cell reads (None)] |
| Period Start Date:
|
[Date the period in view begins] |
Period End Date:
|
[Date the period in view ends] |
The header only appears on the first printed page. Data may be printed on subsequent pages, but the header does not repeat.
Printing the Calendar View
Printing your requests in Calendar view gives you a summary of only your requests and scheduled tasks for the selected period.
- From the Schedule Menu, select My Requests. This opens the My Requests page in Calendar view by Task showing your home profile. If you have requests in another profile, either due to a secondary job or to floats, you can select another profile from the Profile menu.
- If you want, you can select a filter from the Filter menu.
- Select a Calendar View option.
- To print the Calendar by Task view, which displays task names first, and then the scheduled employees, you can continue with the next step. Tasks are sorted by display order, set by schedulers in Staff Manager Client.
- To print the Calendar by Employee view, which displays employee names and then the task names, click Employee in the tool bar. Employees are sorted alphabeticly by last name.
- If you want, you can select Show Requests Only from the menu. This limits the printable view to just your requests. The Calendar printable view only prints your schedule and does not include profile Needs, so the other Show menu options do not apply in Calendar view.
- Click Printable View
 . The printable view, including the Request Header, opens in a separate window or a separate tab, depending on which browser you are using.
- Click Print.
Printing the Weekly View
- From the Schedule Menu, select My Requests. This opens the My Requests page in Calendar view by Task showing your home profile. If you have requests in another profile, either due to a secondary job or to floating, you can select another profile from the Profile menu.
- If you want, you can select a filter from the Filter menu.
- Click Weekly to open the Weekly view by Task. This view displays task name in Task Display Order on the left and the names of the scheduled employees in the cells to the right. If this is the view you want to print, continue to Step 6.
- If you want to print the Weekly view by Employee, click Employee. This view displays employee names alphabeticly on the left and the names of the scheduled tasks in the cells to the right.
- If you want, you can select a Show option.
- Show Requests Only limits the printable view to just your requests.
- Show Only My Schedule limits the printable view to your requests and scheduled tasks.
- Show Needs includes the profile's staffing needs by day and task.
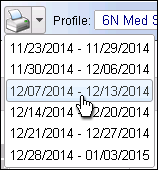
- In Weekly view, the My Requests Printable View icon has a menu, signified by the black down arrow. Click the icon and select the week you want to print, as shown in the following illustration. The printable view, including the Request Header, opens in a separate window.

- Click Print.
 Related Topics
 . This opens the printable view in separate window. Then click the Print button in the header to print your requests. If you have access to a color printer, the printable view prints in color. To get the best view of your requests, print the document in landscape (horizontal) format.
 Related Topics