In-App Help was last updated in 8.6.4 (released 10/23/2019) if you are looking for help with a feature that has been added or enhanced since 8.6.4, please check in Online Help from Help menu.
The Schedule Report
The Schedule Report displays employees and their task assignments by profile and skill for one, two, three, four, and six weeks. You can also select to run this report by month.
In addition, this report displays daily FTE totals by shift category partition and skill. Clairvia Web saves the options you select for each report by your user login once you click Run Report.
If you are using a filter when viewing the report, the filter name is displayed in the Filter menu.
Running the Schedule Report
Complete the following steps to run the Schedule report:
- From the Reports menu, select Schedule > Schedule Report. This opens the Schedule Report page.
- Select one or more Profiles. You can select to report on multiple profiles, up to seven. Use CTRL+click to select multiple items. Use SHIFT+click to select a range of items. Administrative users may select from all the profiles in the database. Employees with report access see only those profiles for which they have security permissions.
- Select a Shift Category. This report uses only one shift category.
- Select one or more Shift Category Partition with Spill-Over.
- Select one or more Skills.
- Select one or more Tasks.
-
Enter a Date in the box or click the calendar icon to use the date menu.
- Select a Number of Weeks: This option allows you to select the number of weeks and, in some cases, whether to print on letter-sized paper, legal-sized paper, or ledger paper. Available choices are:
- 1 Week (automatically prints on letter-size paper)
- 2 Weeks (automatically prints on letter-size paper)
- 3 Weeks (automatically prints on letter-size paper)
- 4 Weeks (Letter)
- 4 Weeks (Legal)
- 6 Weeks (Letter)
- 6 Weeks (Legal)
- 6 Weeks (Ledger)
- Month (Letter)
- Month (Legal)
- Select a Display Format By option: Profile or All Employees.
- Select whether to Group Employees By Partition: If selected, the report groups employees by partition.
- Select an Include Profile Based Unscheduled Employees option: Selecting Yes includes all employees based on the profiles selected, regardless of whether an employee has been scheduled on this profile. This also forces Group Employees by Shift Category Partition to be deselected.
- Select a Display Name Format: Select Full Name or Abbreviation.
- Select an Employee Sort By option:
- Skill and then Employee Name: If you select this option, the option Break out by Job Skills is also available. Including secondary skill information is only possible with the sort Skill and then Employee Name.
- Employee Name Only
- Employee Custom Display Order.
- Select whether to Include Phone Number: If you select Yes for this option, the report displays employees' phone numbers. If the telephone number with extension totals 10 digits, the report displays them using the format XXX-XXX-XXXX. If the telephone number with extension has more or less than 10 digits, the report displays them using the punctuation XXX-XXX-XXXXXXX.
- Select whether to Exclude Scheduled Tasks: If you select Yes for this option, the report displays a blank schedule. This option requires that you select Yes for the Include Profile Based Unscheduled Employees option. Selecting Yes also automatically forces Total By to be None, Float In Display to be Do not display, Float Out Display to be Do not display, and for all Shift Category Partitions and Tasks to be unavailable.
- Select a Show Task option:
- Show abbreviation (displays task abbreviation only)
- Abbreviation with scheduled start/end times when different (always displays task abbreviation, but only displays start/end times when they are different from the default start/end times for the task)
- Abbreviation and coverage start/end times
- Select whether to Mark Filled Opportunities with (O): If you select Yes, then scheduled assignments resulting from filled opportunities display an (O) before the task name.
- Select a Show Unfilled Opportunities and Open Shifts option:
- Schedule Only; Don't Show Opportunities/Open Shifts
- Show Opportunities/Open Shifts and Schedule
- Show Opportunities/Open Shifts Only
- Select whether to Include Paid Hours by Employee: If you select Yes for this option, the report displays the paid hours for home profile employees for the pay period (Float employees paid hours do not display).
- Select a Total By option:
- Select a Calculate Totals By option: Employee Skill or Task Skill.
- Select a Float In Display option. Note that employees only display as Float Ins when scheduled for tasks in profiles where they do not have a primary or secondary job. The options are:
- Separate Table
- Show in Red
- Show with (In)
- Display After Profile Based Employees
- Do not Display
- Select a Float Out Display option. Note that whether an employee displays as a Float Out depends on the profile or profiles you selected. For example, assume Jane Doe has a primary job in Profile A and a secondary job in Profile B. She is scheduled for tasks in each one. When you run the report for Profile A, Jane appears as a home employee for Profile A tasks, but as a Float Out for Profile B tasks. The reverse is true if you run the report for Profile B. The options are:
- Separate Table
- Show in Blue
- Show with (Out)
- Do not Display
- Select whether to Show Notes: If selected, the report prints notes in the page footer. If not selected, the report does not print notes.
- Enter the desired number of Write-in Lines. These lines print at the bottom of the report. You can use the lines for note-taking, recording data, or any other purpose. If you do not want lines, enter the numeral 0 in this box.
- Click Run Report.
To print the report, see Printing Reports.
Viewing the Schedule Report
The Schedule Report displays employees and their skill and task assignments by profile and shift category partition for the selected number of weeks after your selected Start Date. At the end of each shift category, the report displays totals in the format you selected on the selection page.
The report contains the following information:
- Employee
- (Optional) Employee Paid Hours: If included, the number of paid hours per week for each week of the report period print below the names of each home profile employee. In a six-week schedule report, for example, employee Kathy Reimer might be listed as: Reimer, Kathy 40/16/32/40/16/32, indicating that Kathy worked 40 paid hours the first week of the report period, 16 hours the second week, and so on. Paid hours for float employees are not displayed.
- Skill: The skill the employee is working, along with the employee's FTE value (for example, NA 1.00). If you selected Skill and then Employee Name with the Include Secondary Skills option, the report displays duplicate employee entries for each active skill they had during the time of the report. Each entry includes all of their schedule data. This behavior is also applied to unscheduled staff if you selected the Show Unscheduled option. This option does not affect float-in staff, however.
- Date: The task abbreviation of the employee with the skill working the task
- (Optional) Opportunities: If included, these rows display open shifts and unfilled opportunities
- (Optional) Float In/Float Out Employees: If included, employees floating in or out are displayed per your selections on the Schedule Report Selection Criteria tab.
- (Optional) Write-in Lines: Lines for hand-written notes
- Totals (unless you selected Total By: None): The number of hours worked or FTEs assigned to work for each shift category partition and skill combination worked during the shift category
Viewing Tasks that Cross Partitions
In cases where an employee works a shift that starts before midnight and ends during the first partition of the next day, the Schedule report displays a gray cell for the first partition day. The report does not display the employee as working into the first partition when displaying schedule data, as that would make it look like that the employee is working a back-to-back shift. Note that the employee's scheduled work takes place on the day before the report date.
In the following illustration, Jane Doe is working a shift from 19:00 Tuesday night to 11:00 Wednesday morning. Her shift crosses into the next partition, as indicated by the gray cell. Sally Smith is working a shift from 23:00 Tuesday night to 06:29 Wednesday morning. Her shift does not cross into the next partition, so the report does not display a gray cell. You should note that Sally's shift has a spill-over time value of 30 minutes.

Viewing Tasks that Cross the Anchor Partition
An anchor partition is the shift category partition that designates the time when, for analysis purposes, a work day begins. While a calendar day is the 24 hours between one midnight and the next, a work day is the 24 hours from the start of the anchor partition. This is true even if the anchor partition begins in one calendar day and ends in another. For example, an anchor partition that starts at 11:00 p.m. defines a 24-hour work day that begins at 11:00 p.m. and ends at 10:59 p.m. the next day.
The time an anchor partition starts (and thus the work day) can vary from organization to organization. Schedulers set the anchor partition in Staff Manager Client Shift Category dialog box. The anchor partition is always the first Shift Category Partition in a Shift Category.
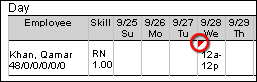
So for tasks that cross an anchor partition, the time prior to the anchor partition is credited to the previous day, while time after the anchor partition is credited to the current day, regardless of when the time was worked by the calendar. Clairvia Web alerts users when a task crosses the anchor partition by using a red triangle or tick mark. Spill-over time front and back can also affect the day to which time is credited.
EXAMPLE
5W MedSurg has a 12-hour RN task that runs from 12 midnight to 12 noon. Qamar Khan has been scheduled for that task on Wednesday, September 28. However, the anchor partition for 5W MedSurg is the Day partition, with a start time of 7:00 a.m. So for analysis purposes, Khan's time from midnight to 6:59 a.m. are credited to Tuesday, September 27, and any time worked from 7:00 a.m. to noon are credited to Wednesday, September 28, even though all of the time Khan worked was on Wednesday by calendar day.
When Khan's supervisor runs the Schedule Report, Staff Manager Online alerts her to the split time by marking it with a red tick mark.
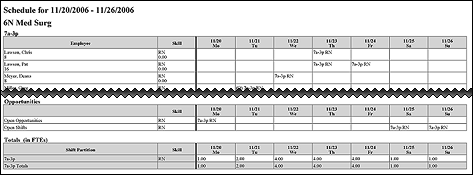
Sample Report
This partial sample of a Schedule Report displays unfilled Opportunities and totals in FTEs at the bottom.
 Related Topics