In-App Help was last updated in 8.6.4 (released 10/23/2019) if you are looking for help with a feature that has been added or enhanced since 8.6.4, please check in Online Help from Help menu.
The Admin Dashboard pushes pertinent information to each administrative user. The Admin Dashboard may display any or all of the following sections, depending on configuration option settings.
Depending on how the Manager's View has been configured, you may see a My Alerts icon in the upper right corner of the Schedule, Staffing Views, Report, Tools, and Configuration pages, including the Admin Dashboard.
When you have not selected the My Alerts icon, it is white with a blue bell. ![]()
When you position your pointer over the icon, it is blue with a white bell. ![]() The message My Alerts is also displayed in a tooltip.
The message My Alerts is also displayed in a tooltip.
Clicking the icon opens the My Alerts window. Depending on your configuration, you may see the following items.
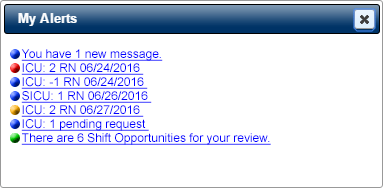
The My Alerts window also displays whether you have messages in the Message Center. The following illustration shows an example of the My Alerts window. You can click the links to act on the link information.
Note: The My Alerts window does not refresh automatically, nor does it show if you have received any new alerts. You must click the My Alerts icon again in order to see any new alerts.
Current Census displays the census values at the time of the last staffing decision point for the administrator's selected profiles for the current view date.
Important: For the application to display census information, it must import census data into Staff Manager Client for the date you are viewing. The application can import this data through an interface, or you can manually enter and publish census date with the Productivity application.
Staff View displays a bar chart of actual and target staffing for the selected day for the selected profiles. The daily view by profile displays total actual FTEs and total required FTEs for all skills for the selected profiles. You can view information for up to five profiles, as configured on the Manager View Configuration page. (The profiles are limited to five due to window size.)
When you log on to Clairvia Web, the Admin Dashboard displays data for the current date. You can move the view backward or forward by using the double-arrows or the date menu. Clicking << moves you back one day; clicking >> moves you forward one day. Clicking the date link opens the date menu. Choosing a new date from the date menu displays the information for that date.
Clairvia Web also displays the number of FTEs staffed and targeted for the day in a pop-up when you point your cursor at the profile's bar in the chart. The target staff numbers displayed are based on Workload Planner. In organizations using the optional Demand Manager application, the target staff is based on Demand values.
You can find more information about staffing for a profile by drilling down two levels in the staffing data. The initial display includes the total actual and the total required staffing in FTEs for the selected profile or profiles on the selected date. Total actual (or scheduled) staff numbers display in blue. Total target staff numbers (based upon the profile's variable staffing methodology) display in purple.
Clicking a bar again returns you to the original Staff View chart.
This section displays all pending and wait listed requests in your selected profiles. Each profile's requests are displayed as a single link; for example, There are 7 pending requests and there is 1 wait listed request on Profile: 6N MedSurg. When you click on a profile's request link, the appropriate Administer Requests page opens with the first date of the first request item in that profile visible.
If your organization uses the optional Shift Opportunities or Shift Swap features, the page also displays pending opportunities and shift swaps as links in this section.
Notes: You may need to scroll down in the table to locate all request items. Employees can cancel pending Consider Me Shift Opportunity requests. See Canceling a Pending Shift Opportunity for more information.
The Admin Dashboard displays staffing alerts as hyperlinks under the Staff View. Each alert lists the staffing variances by skill (planned - actual) in a profile for a day.
For example, if the 6N MedSurg profile's staffing variance (the difference between the staff actually scheduled and the required staff) was down by one RN FTEs on 7/23/2008, the alert would display as a link: 6N MedSurg: -1 RN 7/23/2007. If you click the staffing alert link, the Enterprise Staffing page displays information for the profile, day, and skill.
The Competency Expirations section of Admin Dashboard displays expiration alerts for employees. You can add employee competencies (and their expiration dates) in Staff Manager Client.
Note: For competency expiration alerts to display, they must have an associated threshold on the Profile Alerts tab of the Competency Type Maintenance dialog box in Staff Manager Client.
The Competency Expirations section displays the following information:
The expired competency alerts display a round red icon  . Those that fall within the threshold for expiration alerts, as set in Staff Manager Client, display a round yellow icon
  . You can also configure the number of days of competency expiration alerts displayed on the Admin Dashboard.
The Message Center of the Dashboard contains links to the messages sent to you from the Clairvia Web Messages tool. Each message lists the sender, the subject, and a date and time stamp. Click the message subject link to display the message.
Unless a Staff Manager Technical Support Analyst has configured your solution to include SMTP server access, you can only view messages within Clairvia Web. The application does not send these messages to any other email accounts. If your message is time sensitive, or if you are unsure whether the intended recipient logs in to Clairvia Web regularly, you may also want to send the information using a standard email application.
The Message Center of Admin Dashboard also includes the Administrator's Note feature. Administrators use this feature to set a profile note that displays on the Dashboard view for all profile employees.
The Message Center of Admin Dashboard includes the Administrator's Note feature. Administrators may also set a profile note that displays on the Dashboard view for all employees who log into the profile.
Complete the following steps to add an administrator's note to a profile:
When employees in the selected profile log into Clairvia Web, they will view the administrator's note on their Dashboard. The Admin Note is displayed even if you configure the Dashboard not to display the Message Center.
 Related Topics