In-App Help was last updated in 8.6.4 (released 10/23/2019) if you are looking for help with a feature that has been added or enhanced since 8.6.4, please check in Online Help from Help menu.
The Productivity Summary Report
The Productivity Summary report provides an executive-level summary and comparison of target, budget, and actual data. This summary combines data available in other reports, allowing you to analyze the data without running multiple reports.
Clairvia Web saves the options you select for each report by your user login once you click Submit Report.
Running the Productivity Summary Report
Complete the following steps to run the Productivity Summary report:
- From the Reports menu, select Management > Productivity Summary. This opens the Productivity Summary Report page with the Selection Criteria tab active.
- Select a Report By option. Your selection here determines how the report groups the data for review. The available options are Profile, Service Line, and Facility, with Profile being the default selection.
- Select a facility or facilities. Use CTRL+click to select multiple items. Use SHIFT+click to select a range of items.
- For a facility to appear in this menu, it must contain profiles configured for Demand Manager that you have permission to view.
- The menu displays facilities in ascending alphanumeric order.
- The facilities you select determines which Service Lines are available in the next menu.
- Select a service line or lines.
- This menu lists the service lines associated with your selected facilities and an additional option named Unassigned. Selecting the Unassigned option includes all those profiles that are not mapped to a service line.
- The menu displays service lines in ascending alphabetic order.
- The service line or lines you select determines which profiles are available in the next menu.
- Select a profile or profiles. If you have never run this report before, all profiles are selected by default.
- This menu only lists profiles that meet the following criteria:
- The profile is configured for Demand.
- The profile is one you have the proper security permissions to report on.
- The profile belongs to one of your selected facilities and service lines.
- The menu displays profiles in ascending alphanumeric order.
- Enter a start date in the box or click the calendar icon to use the date menu. The default start date is today.
- Enter an end date in the box or click the calendar icon to use the date menu. Your selected end date must be equal to or fall after your selected start date. In addition, the end date must be within 12 months of your start date. The default end date is today.
- Select a Select Midnight Census option. Available options are On hour at start of day (that is, the census when the day officially begins) and At 11:59 at end of day (the census when the day officially ends).
- Select a Target option. Available options are Planner and Demand.
- The Planner option calculates the Target value using data in the Staff Manager Client Workload Planner. This is the default option.
- The Demand option calculates the Target value using Demand data.
- Select which Skills the report includes. Available options are All Skills and Specific Skill.
- If you select All Skills, the report includes all global skills in your selected profiles. This is the default option.
- If you select Specific Skill, the page displays a Skill Selection menu. This menu lists all Global Skills in your selected Profiles. You may only select one Specific Skill.
- Enter your email address in the Email Recipients box. If you want, you can also add additional email addresses to send the report to other people. When entering multiple addresses, separate the email addresses with the punctuation used by your facility; this is usually a comma (,) or a semi-colon (;). The report uses the exact text you enter here in the email To: line when sending the report output.
- Click Submit Report.
- The solution reviews your report selections. If there are any invalid selections, or if you entered an email address with an invalid format, the page displays an error message prompting you to make corrections.
- If all required fields are populated correctly, the page displays the following message:
Report Submitted
Your report has been submitted and will be processed as quickly as possible. The report process may take several hours to complete.
You will receive an email confirmation for submitting the report and an email notification when the report is ready.
- Click OK to close the message alert box.
When the solution has finished processing your report, it sends the report to the address or addresses you entered in the Email Recipients box.
To clear all your selections on the Selection Criteria tab, click Clear Form at the bottom of the page.
To print the report, see Printing Reports.
Viewing the Productivity Summary Report
The email you receive has the Productivity Summary Report attached in two formats: portable document format (PDF) and comma-separated values (CSV). Both files contain the same data, but the output displays differently.
Notes: The report only calculates demand for direct care hours. It does not calculate demand for indirect, operational, or benefit hours. As a result, if you selected Demand as your target, the columns for Direct HPPD Demand Target, Worked HPPD Demand Target, and Paid HPPD Demand Target will always match.
If Demand is not configured for one of your selected profiles, the report uses the Planner values instead. If none of your selected profiles are configured for Demand, the report uses the Planner values and changes the columns to read Planner, not Demand.
Key to Report Column Abbreviations
- ADT: Admissions, Discharges, Transfers
- FTEs: Full Time Equivalents
- HPPD: Hours per Patient Day (typically the amount of patient care, in hours, that is targeted for a patient or patients on a unit or in a facility for a given day)
- Util (T/S): Utilization (Target/Scheduled)
Viewing the PDF Output
The report header includes the following information:
- The report title, Productivity Summary Report
- Your selected Report By option and Skill section, such as Productivity by Facility for All Skills or Productivity by Profile for RN
- Your selected Start and End Dates
The report footer includes the date and time the report was generated and page information, such as Page 1 of 3.
The headings and rows in the report grid change based on your selected Report By option:
- If you selected Report by Facility: The first column heading reads Facility. Each row represents a facility, and each column contains the combined data for the selected profiles within that facility, calculated as a simple average.
- If you selected Report by Service Line: The first column heading reads Service Line. Each row represents a service line, and each column contains the combined data for the selected profiles associated with that service line, calculated as a simple average. If any of your selected profiles are not associated with a service line, their data displays in a group named Other.
- If you selected Report by Profile: The first column heading reads Cost Center and displays the Primary Cost Center number as defined in the Edit Profile dialog box in Staff Manager Administrator or the Cost Center Mapping page in Clairvia Web. The second column heading reads Profile. Each row represents a profile and each column represents the data for that profile.
The following columns are the same for reports by Facility, Service Line, and Profile. The report displays all calculated values to the second decimal unless otherwise specified. Except for certain values, such as those shown in the ADT Index and Utilization columns, numerical values are averages of the daily values per patient based on your selections of a Start Date, End Date, Target, and Skills.
Utilization columns, which all contain the words Util (T/S), are also color-coded. Values greater than or equal to 100% display in bold red text. Values less than or equal to 100% display in italic blue text.
The first set of columns in the report covers general information.
- Budget Census: The sum of the budgeted census for all locations mapped to the profile. You can find the Budgeted Census on your Demand Manager Demand Settings Target & Budget Data tab.
This value can change over time. If it changed during your selected report period, the report displays the weighted budget for the period. For example, assume that your selected start and end dates cover a period of 11 days. For 10 days during this period, the budgeted census was 10; for one day during this period, the budgeted census was 11. The report displays a budget census value of 10.09: the sum of 10 days at 10 (100), plus 11 for the eleventh day (111), divided by 11 days equals 10.09 per day.
- Average Midnight Census: For Reports By Profile, this column displays the daily average of the midnight census across the report period for the profile.
The solution calculates the average midnight census by adding all the patients in all locations mapped to the profile each day and dividing that by the number of days in your selected date range. Remember that this number depends on your Select Midnight Census option. If you selected On Hour at Start of Day, the report uses the census when the day officially began. If you selected At 11:59 at End of Day, the report uses the census when the day officially ended. For Reports By Facilities or Reports By Service Lines, the report averages all the Average Midnight Census values for the selected profile or profiles belonging to your selected facilities or service lines.
- Average Cumulative Volume: This column displays the average cumulative volume for a profile. The report calculates the average cumulative volume by adding the cumulative volume for each day in the report period and then dividing that by the number of days in the report period.
A day's cumulative volume calculation changes based on your Target selection.
- If you selected Target Planner: The solution calculates cumulative volume for a given day by averaging the census entered for each shift partition in the Workload Entry dialog box of Staff Manager Client.
- If you selected Target Demand: The solution calculates cumulative volume for a given day by averaging the HL7 Census for each shift partition.
Note: For both Planner and Demand targets, if a profile uses the Workload Class Workload Methodology with Sum Volume by Day selected, then the solution adds the census for each shift partition to calculate the cumulative volume for that day. This calculation depends on the Sum Volume Effective Date as follows: For days before the Sum Volume Effective Date, the Shift Partitions are averaged. For days after the Sum Volume Effective Date, the Shift Partitions are added. See Reports and Volume for more information.
The cumulative volumes (however calculated) for each day are still added together for the report period and then divided by the number of days in the report period. If a profile contains multiple locations, then the profile's cumulative volume for each day is a sum of the cumulative volume of each location in that profile.
- ADT Index: The ADT Index is the number of admission, discharge, and transfer (ADT) events within a Profile summed over the report period and divided by the Patient Days (also known as Midnight Census) and displayed as a decimal, such as 0.20.
For example, if the census is 20 and the number of ADT events is 4, the ADT Index is 0.2 (4 ÷ 20 = 0.2). Your chosen Select Midnight Census option also affects how the ADT Index is calculated.
- Mid Acuity Level: This value comes from the Mid Level Acuity setting, which you can find on your Demand Manager Demand Settings Acuity Settings tab. If a profile has multiple locations, this column displays the average Mid Level Acuity for all locations in the profile.
This value can change over time. If it changed during your selected report period, the report displays the weighted Mid Acuity Level for the period.
- Average Acuity Level: The report calculates this value by adding each patient's acuity level (whether from a completed assessment or the default acuity level) at the report end time, then dividing by the number of patients in the location.
The report uses the latest published acuity level value within your selected report period.
The next set of columns reports on all paid hours, including productive, non productive, and benefit hours.
- Paid HPPD [Planner or Demand] Target: The name of this column changes based on whether you selected Planner or Demand as your Target. The report calculates the values for this column as follows:
- If you selected Target Planner and All Skills: The report calculates this value by adding the total hours represented in the Staff Manager Client for all skills, dividing that by the number of days in your report period, and then dividing that number by the Average Midnight Census. The report calculates total hours in Workload Planner by taking the number in the cell for a shift and skill, multiplying it by the number of hours in the shift, and adding all applicable hours for the days in the report period.
- If you selected Target Planner and Specific Global Skill: The report calculates this value by adding the hours in Staff Manager Client Workload Planner for all profile skills that belong to your selected Global Skill, dividing that value by the number of days in your report period, and then dividing that result by the Average Midnight Census.
- If you selected Target Demand and All Skills: The report calculates this value by adding all Total Care hours in Demand Manager for all skills, dividing that value by the number of days in your report period, and then dividing that result by the Average Midnight Census. The report calculates total Demand Manager hours by summing the care hours for all skills for each patient in locations mapped to the profile skill for the days in your report period.
- If you selected Target Demand and Specific Global Skill: The report calculates this value by adding all Total Care ours in Demand Manager for your selected Global Skill, dividing that value by the number of days in your report period, and then dividing that result by the Average Midnight Census. The report calculates total Demand Manager hours by summing the care hours for skills that fall under your selected Global Skill for each patient in locations mapped to the profile for the days in the report period. Be aware that this value may be zero if your selected skill is not configured for demand.
- Paid HPPD Actual: This column displays the actual number of paid hours scheduled per patient per day.
The Average Midnight Census used in these calculations depends on your Select Midnight Census option. The report calculates the values for this column as follows:
- If you selected All Skills: The report calculates this value by adding the number of hours for tasks scheduled in Staff Manager Client that are mapped to any User Defined Fields (UDFs) belonging to a Paid UDF Category, dividing that value by the number of days in your report period, and dividing that result by the Average Midnight Census. Paid UDF Categories start with 1, 2, 3, or 5* and usually follow the naming convention 1 Direct/Variable, 2 Indirect/Fixed, 3 Operational, and 5* Benefit.
- If you selected Specific Global Skill: The report calculates this value by adding the number of hours for tasks scheduled in Staff Manager Client that fall under your selected Global Skill that are mapped to any UDFs under a Paid UDF Category, dividing that value by the number of days in your report period, and then dividing that result by the Average Midnight Census.
Note: Some paid hours may be excluded if Operational and Benefit tasks are not associated with a specific skill. In addition, some paid hours may not align with the UDF value on the Productivity Paid Hours report if the UDF field of a profile skill has tasks that do not fall under a corresponding global skill.
- Paid Util (T/S): The column heading stands for Paid Utilization (Target/Scheduled). The report calculates this value by dividing the Paid HPPD Target value by the Paid HPPD Actual value.
The report displays the result a percentage with no decimals, such as 95%.
The third set of columns reports on productive and non-productive worked hours.
- Worked HPPD [Planner or Demand] Target: This column displays the target number of paid worked HPPD.
The report calculates the values for this column as follows:
- If you selected Target Planner and All Skills: The report calculates this value by taking the total hours represented in the Staff Manager Client Workload Planner for all skills, dividing that result by the number of days in the report period, and then dividing that result by the Average Midnight Census. The report calculates the total hours in Workload Planner by taking the number in the cell for a shift and skill, multiplying it by the number of hours in the shift, and then adding all applicable hours for the days in the report period.
- If you selected Target Planner and Specific Global Skill: The report calculates this value by taking the hours represented the Staff Manager Client Workload Planner for all profile skills falling under your selected Global Skill, dividing by the number of days in the report period, and dividing that result by the Average Midnight Census.
Note: The Worked HPPD Planner Target value always matches the Paid HPPD Planner Target because the only difference between the two is benefit time, and benefit time is not included in Workload Planner.
- If you selected Target Demand and All Skills:
The report calculates this value by taking the total care hours calculated by Demand Manager, dividing that by the number of days in the report period, and dividing the result by the Average Midnight Census. Demand Manager calculates the total hours by adding the care hours for all skills for each patient in locations mapped to the profile skill for the days in the report period.
- If you selected Target Demand and Specific Global Skill: The report calculates this value by taking the total care hours calculated by Demand Manager for your selected global skill, dividing that by the number of days in the report period, and then dividing that result by the Average Midnight Census.
Notes: If your selected skill or skills are not configured for demand, the value in this column will be zero.
The values in the Direct HPPD Demand Target, Worked HPPD Demand Target, and Paid HPPD Demand Target columns always match because demand is only calculated for direct care hours, not indirect, operational, or benefit hours.
- Worked HPPD Actual: This column displays the actual number of paid worked hours scheduled per patient per day.
The Average Midnight Census used in these calculations depends on your Select Midnight Census option. The report calculates the values for this column as follows:
- If you selected All Skills: The report calculates this value by adding the number of hours for tasks scheduled in Staff Manager Client that are mapped to any User Defined Fields (UDFs) belonging to a Worked UDF Category, dividing that value by the number of days in your report period, and dividing that result the Average Midnight Census. Worked UDF Categories start with 1, 2, or 3 and usually follow the naming convention 1 Direct/Variable, 2 Indirect/Fixed, and 3 Operational.
- If you selected Specific Global Skill: The report calculates this value by adding the number of hours for tasks scheduled in Staff Manager Client that fall under your selected Global Skill that are mapped to any UDFs under a Worked UDF Category, dividing that value by the number of days in your report period, and then dividing that result by the Average Midnight Census.
Note: Some Worked hours may be excluded from the report because Operational tasks are not always associated with a specific skill. In addition, some worked hours may not align with the UDF value on the Productivity Paid Hours report if the UDF field of a profile skill has tasks that do not fall under a corresponding global skill.
- Worked Util (T/S): The column heading stands for Worked Utilization (Target/Schedule). The report calculates this value by dividing the Worked HPPD Target by the Worked HPPD Actual.
The report displays the result a percentage with no decimals, such as 95%.
The fourth set of columns reports on direct care hours.
- Direct Care HPPD [Planner or Demand] Target: This column displays the target number of direct care hours per patient day. The report calculates the values for this column as follows:
- If you selected Target Planner and All Skills: The report calculates this value by adding all hours represented in the Staff Manager Client Workload Planner for skills not labeled Indirect, dividing by the number of days in the report period, and dividing the result by the Average Midnight Census. Administrators can mark skills as Indirect using the Staff Manager Client Skills dialog box. An example of an Indirect Skill would be UC, or Unit Clerk, where the employee assigned to that skill does not care for patients. Any skill not marked as Indirect, therefore, is automatically counted as a Direct Care skill. The report calculates the total hours in Workload Planner by taking the number in the cell for a shift and skill, multiplying it by the number of hours in the shift, and then adding all applicable hours for the days in the report period.
- If you selected Target Planner and Specific Global Skill: The report calculates this value by adding all hours represented in the Staff Manager Client Workload Planner for profiles skills that are not labeled Indirect and that fall under your selected Global Skill, dividing by the number of days in the report period, and dividing the result by the Average Midnight Census.
- If you selected Target Demand and All Skills: The report calculates this value by taking the total care hours calculated by Demand Manager, dividing that by the number of days in the report period, and dividing the result by the Average Midnight Census. Demand Manager calculates the total hours by adding the care hours for all skills for each patient in locations mapped to the profile skill for the days in the report period.
- If you selected Target Demand and Specific Global Skill: The report calculates this value by taking the total care hours calculated by Demand Manager for your selected global skill, dividing that by the number of days in the report period, and dividing the result by the Average Midnight Census. Demand Manager calculates the total hours by adding the care hours for skills falling under your selected Global Skill for each patient in locations mapped to the profile for the days in the report period.
Notes: This column may display zeroes if your selected skill or skills are not configured for demand.
The Direct HPPD Demand Target, Worked HPPD Demand Target, and Paid HPPD Demand Target always match because Demand is only calculated for Direct care hours and not indirect, operational, or benefit hours.
- Direct Care HPPD Actual: This column displays the actual number of direct care hours scheduled per patient per day.
- If you selected All Skills: The report calculates this value by adding the number of hours for tasks scheduled in Staff Manager Client that are mapped to any User Defined Fields (UDFs) belonging to a Direct/Variable UDF Category, dividing that value by the number of days in your report period, and dividing that result the Average Midnight Census. Direct/Variable UDF Categories usually start with 1 are the name Direct or Variable (that is, 1 Direct or 1 Variable).
- If you selected Specific Global Skill: The report calculates this value by adding the number of hours for tasks scheduled in Staff Manager Client that fall under your selected Global Skill that are mapped to any UDFs under a Direct/Variable UDF Category, dividing that value by the number of days in your report period, and then dividing that result by the Average Midnight Census.
Note: This column may not align with the UDF value on the Productivity Paid Hours report if the UDF field of a profile skill has tasks that do not fall under a corresponding global skill.
- Direct Care Util (T/S): The column heading stands for Direct Care Utilization (Target/Schedule). The report calculates this value by dividing the Direct Care HPPD Target by the Direct Care HPPD Actual.
The report displays the result a percentage with no decimals, such as 95%.
The fifth set of columns reports on position control by comparing target positions to filled positions.
The report is sized to print on standard 8.5 x 11 inch paper. This means that the report may truncate Facility, Service Line, or Profile names in some instances to fit the rest of the report data on the page.
Viewing the CSV Output
While the data in the CSV file is the same as the PDF file, there are three main differences:
- There is no report header.
- There is no report footer.
- The column titles display as a header row.
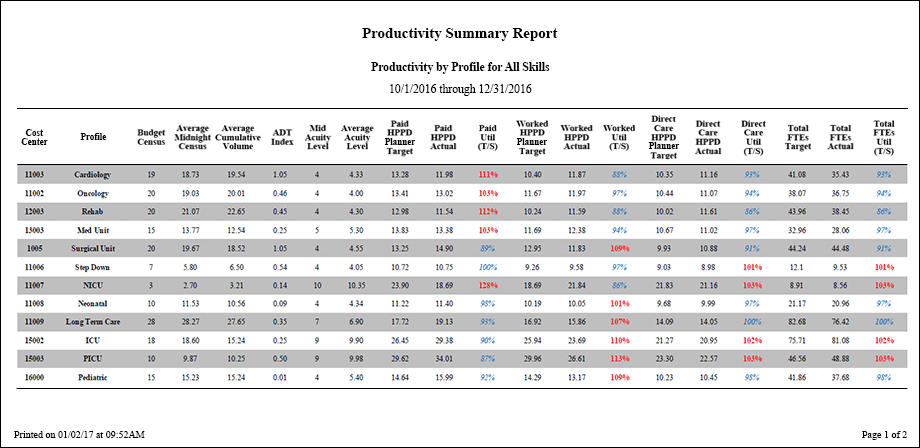
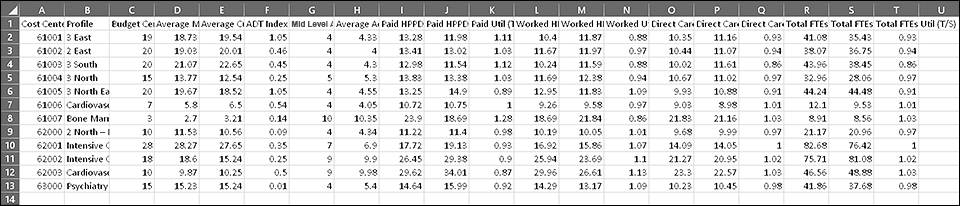
Sample Report
The following illustration shows the report as a PDF file.
The next illustration shows the same report as a CSV file viewed in Microsoft Excel.
 Related Topics