
In-App Help was last updated in 8.6.4 (released 10/23/2019) if you are looking for help with a feature that has been added or enhanced since 8.6.4, please check in Online Help from Help menu.
Shift swapping is an optional feature. In profiles using shift swapping, you can create, edit, and cancel shift swap invitations.
The application checks that all swaps meet the following criteria, unless managers set Clairvia Web to either ignore all shift swap rules or to ignore the rules marked (Optional) below.
You can also swap certain non-productive tasks if your organization has set the shift swap feature to allow it. Schedulers must mark these tasks as Non productive for Shift Swap in Staff Manager Client.
The following codes mark a shift swap’s status.
These codes also mark shifts in Staff Manager Client. Schedulers can view shift swap information in Staff Manager Client Schedule Editor or Daily Editor. The shift swap status codes are displayed next to the employee’s name.
The Shift Swap window is where you make shift swaps. Open the window by right-clicking the shift you want to swap and selecting Request Shift Swap from the context menu.
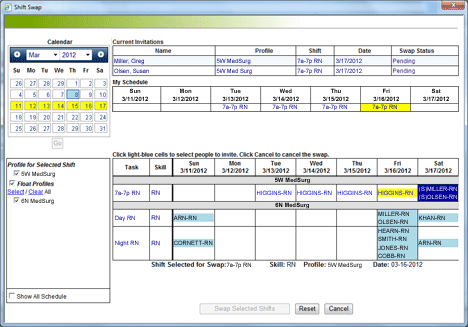
The following illustration shows the six major sections of the Shift Swap window.

|
The Calendar displays the current date (the date with the blue background) and the week of your original shift (the week with the yellow background). You can change the week you would like to shift swap into by using the calendar controls and clicking GO. |
|
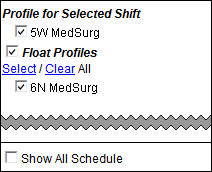
The Profile menu allows you to select the profiles you would like to swap with. If you cannot float to other profiles, Staff Manager only displays your home profiles here. Home profiles are any profiles where you have a defined job and skill. If you can float to other profiles, and those profiles are configured to allow cross-profile swapping, Staff Manager displays those profiles, and you can select which profiles Staff Manager should show in the Shift Swap table. The Show All Schedule option allows you to select whether you see only the shifts available to swap or all shifts in the schedule. The default setting is off (unchecked) so that you only see the shifts available for swapping. |

The My Schedule table displays your schedule for the week of the task you want to swap. Staff Manager highlights the specific shift to be swapped in yellow.
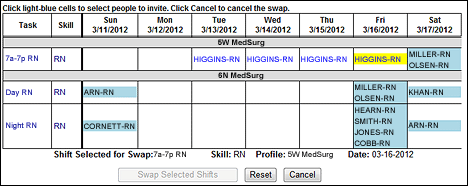
The Shift Swap table displays your selected profile (or profiles) and the shifts available for swapping. Employees highlighted in light blue have tasks available to swap. Clicking an employee's name selects them for swap invitations; you can select as many employees as you want.
Once you have selected employees for swap invitations, click one of the action buttons:
If you select to add swap invitations after sending the initial invitations, the Shift Swap window displays an additional table above the My Schedule table. This is the Current Invitations table, and it displays who has already been sent shift swap invitations for the current shift you are trying to swap.
In the following illustration, Rebecca Higgins has already invited Greg Miller and Susan Olsen to swap shifts, as shown by the Current Invitations table. The Shift Swap table also displays that Miller and Olsen have received invitations by putting an (S) in front of each name, putting a navy blue background behind their names, and changing the text the text to white. The task to be swapped is still shown with a yellow background, and available candidates have light blue backgrounds.
In some profiles, managers must approve all shift swaps. Users in these profiles make swap invitations normally, but the swaps do not go into effect right away. Clairvia Web first sends the swap requests to the manager, who approves or denies them.
When you invite several people, Clairvia Web sends managers the names of everyone who accepted. Managers then select which employee will work the shift.
When someone accepts a swap invitation, Staff Manager puts an (S) in front of their name on the schedule. The S stands for Swap Invitee. This lets other users know an accepted swap is waiting for approval. The original user’s cell retains the (RS) code until the swap is approved or denied.
When a manager approves a swap, the application updates the schedule in Clairvia Web and Staff Manager Client. Clairvia Web sends messages to the original user and the selected employee that their swap is approved and their schedules have changed. Employees not selected for the swap get a message that the manager denied the swap.
If cross-profile swapping and manager approval is required by one or both of the profiles involved, the necessary approval must be completed before the swap can take effect.
Complete the following steps to make a Shift Swap invitation:
The Weekly Schedule page refreshes to show (RS) before your name, meaning Requested Swap.
Complete the following steps to edit or cancel a Shift Swap invitation:
Clairvia Web sends shift swap invitations via the Message Center. Invited users get a message marked Invitation to Swap Shifts. The message includes a table showing the swap dates, the three days before, and the four days after the shift.
Complete the following steps to accept or decline a Shift Swap invitation:
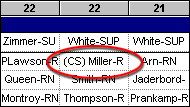
The following illustration shows how the Schedule Editor and Daily Editor in Staff Manager Client display the result of a shift swap.
Schedulers can mark tasks, such as tracking tasks, so that Clairvia Web does not display them. People assigned to invisible tasks can seem to be shift swap candidates when they are not. You will not know a person is unavailable until the swap is in progress; the Invite Employees to Swap dialog box does not list people assigned to invisible tasks.
EXAMPLE
The scheduler creates a tracking task named Medical Leave. For privacy reasons, the scheduler also sets this task so that it will not display in Clairvia Web. Greg decides to swap his Friday 7a-3p RN shift for a shift earlier in the week. Deana and Pat are working the Wednesday 7a-3p RN shift and seem to be good swap candidates. Greg decides to invite them both to swap shifts with him; however, when the Shift Swap window opens, Greg only sees Deana's name. What Greg cannot see is that Pat is scheduled to the Medical Leave task starting Thursday. This means Pat will not be available for any Friday shifts.
Shift swap invitations have expiration times. Facilities set the expiration time when they install Clairvia Web. Most set invitations to expire 10 minutes before midnight on the day before the shift to be swapped takes place.
If a user does not accept or decline an invitation before the expiration time, it expires. Clairvia Web will also inactivate the swap invitation in the user’s Message Center. If a manager must approve all shift swaps, swaps will expire if a manager does not approve them in time.
Profiles can set the Shift Swap feature to ignore pay periods. In such profiles, Shift Swap presents you with shifts outside your current pay period. Overtime and maximum hour limits are not in effect. You must consider your current schedule carefully when making a swap under these circumstances.
Clairvia Web records audit data on all shift swap actions. Audit data includes all the swap details, such as who requested the swap, the invited employees, and the swap creation time. Users with report access can review audit data with the Swap Report.
 Related Topics