In-App Help was last updated in 8.6.4 (released 10/23/2019) if you are looking for help with a feature that has been added or enhanced since 8.6.4, please check in Online Help from Help menu.
You are here: For Employees > Understanding How Clairvia Web Displays Requests
Understanding How Clairvia Web Displays Requests
You view requests on the My Requests page. Depending on how your profile is configured, you may be able to see all requests or just your own. This topic reviews the different ways requests are displayed.
Your name always displays in italic text, while the names of other users display in plain text.
Requests display differently based on their status:
- Pending requests are marked (P). They have a dark blue background for your requests and a pale blue background for requests from other users.
- Approved requests are marked (A). They have a dark green background for your requests and a pale green background for requests from other users.
- Denied requests are marked (D). They have a dark red background for your requests and a pink background for requests from other users.
- Wait Listed requests are marked (W). They have an orange background for your requests and a pale orange background for requests from other users. Note that requests are only wait listed if your organization enables request limits with the wait list option.
There are also icons to mark special types of requests.
- Requests for multiple days:
 . This icon is only used in the Weekly view.
- Recurring requests:
 . This icon is used in the Weekly view and in the Request Details Date window.
You cannot make recurring requests in Clairvia Web. Schedulers create recurring requests in Staff Manager Client. If you need a recurring request, you should discuss it with your manager.
How Request Notes Are Displayed
Both you and schedulers can add notes to requests. In the Weekly view, notes are marked using two icons:
- If you add a note, the request is marked with a white note icon
 .
.
- If the scheduler adds a note to a request, the request is marked with a yellow note icon
 .
.
|

User note
|

Scheduler note
|
In the Calendar view, the note icons are not displayed. You can see notes in two different ways, however.
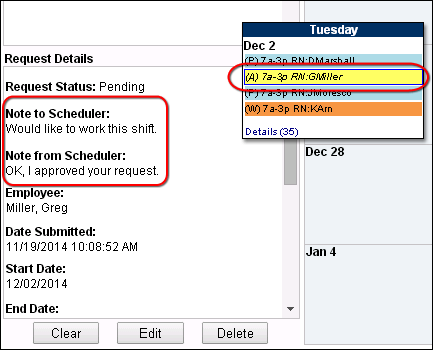
- Click a request to select it and any notes for that request, both to and from the scheduler, display in the Request Details pane.

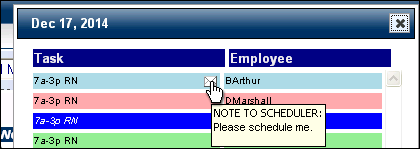
- Clicking the Details link at the bottom of any calendar cell opens the Requests Date Details window. Notes to schedulers are marked with the white note icon; notes from schedulers are marked with a yellow note icon. You can position your pointer over the note to see a note's contents.

 Related Topics

